
Sometimes, the simplest things end up being so satisfying.
I’ve crocheted complicated garments before and felt pleased with the results. It’s always been simple, classic designs, however, that make me happiest and produce clothes that I wear over and over again.
The added bonus? They are easy to make, easy to modify, and even beginners can tackle them.


The Cedar Top came to life when I wanted to use a new stitch I created (Cedar Stitch) in a garment. It was stretchy without leaving large gaps, and offered a drapey, curve-hugging effect that I don’t often see in crocheted clothes.
The top’s bateau neckline is classy, suits all shapes, and the color blocking gives it some interest without involving complicated color work. I wear mine under cardigans, on its own, and with skirts or jeans! It can be worn in summer, fall, winter, or spring.
The pattern is meant to be stitched to your own dimensions, and can be modified to any length—cropped, hip-length, or even tunic-style to be worn with leggings.


You can use any yarn you want without worrying about gauge, since the pattern is designed for your individual dimensions. A DK or finger weight yarn is more likely to give you a bit of drape with less bulk, though.
The Cedar Top pattern is FREE on Ravelry.
Cedar Top

Pattern PDF: Log into Ravelry for a free PDF of the pattern
Materials:
- Berroco Remix® Light
- Birch
- Smoke
(1 skein of each color was used in sample garment. See directions to calculate yardage needs.)
- 3.75mm crochet hook
- Tapestry needle
- Safety pins
- Measuring tape
Abbreviations (USA):
ch chain
sc single crochet
sk skip
sl st slip stitch
sp space
st(s) stitches
Gauge: 10 repeats in pattern (1 ch, 1 sc) and 22 rows = 4”
Finished Measurements: (N/A)
Difficulty: Beginner to Easy
As always, please contact me via Ravelry if you ever have questions about the pattern.
***INSTRUCTIONS***
PART 1: Making the Blueprint
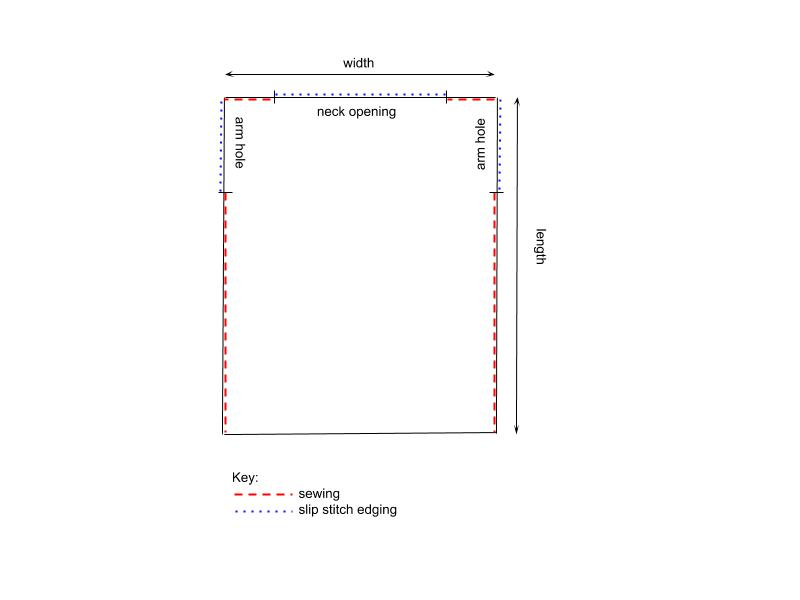
The pattern blueprint works for both the front and the back of the pattern, as they are identical. Please refer to the diagram on Page 3 when needed.
Width: The width of the finished top must be at least as wide as the widest part of your torso. This could be your bust, waist, or hips if you choose to make a longer top. Measure around the widest part of your torso and record that number. Add a minimum of 2” to this number for ease (you may add more for a looser top), then divide the total by 2. This is your pattern width.
Circumference of widest part of torso + ____ ease
_____________________________________ = Pattern width
2
Length: Measure from the top of your shoulder straight down to where you want the top to end. This is your pattern length.
PART 2: Calculating Yarn Requirement
Calculate area: Multiply the width and the length of the pattern, then multiply the total by 2 (for each side). This is the total area of crocheted fabric.
Length x width x 2 = total area of garment
Calculate yarn weight requirement: The pattern uses roughly 0.24 grams of yarn per square inch (including arm and neckline borders). Multiply your total area by 0.24 to obtain the total amount of yarn (in grams) required for the project.
Area x 0.24 = grams of yarn needed
Important: Due to differences in stitch tension amongst crocheters, it is advised that you purchase slightly more yarn than estimated. These calculations are meant to be a general guideline and will likely not be exact.
PART 3: Constructing the FRONT and BACK
Note: This stitch pattern does not require turning chains.
FRONT
Using the color you prefer for the top of the garment, ch an odd number of sts to desired length, +1 st.
Row 1: Sc into 2nd ch from hook. Ch 1, sk next ch, sc into next ch. Continue across, ending on sc.
Turn.
Row 2: Sc into first sc. Ch 1, sk next ch, sc into next sc. Continue across, ending on sc.
Rows 3+: Repeat Row 2 and continue until the piece fits your measurements from Part 1. Switch to the second color whenever desired.
BACK
The back of the top is identical to the front.
PART 4: Assembly
Pinning: Using safety pins, attach the two pieces at the top corners so that you can try on the garment. Pin it loosely at the sides, starting under the arms, and along the shoulders to allow for a neckline. If you prefer, you may very loosely stitch the garment together with contrasting yarn and a tapestry needle to see how it fits first, before doing the final sewing. Make sure the neck opening is large enough that you can remove the garment over your head.
Sewing: Take off the pinned garment. Using a darning needle and matching yarn, whipstitch the sides and shoulders along the areas that you pinned. Tie off yarn securely.
PART 4: Edging and Finishing
Slip stitch edging: Using matching yarn, slip stitch into each stitch around the neck opening and around each arm hole.
Finishing: Weave in all ends.
PATTERN DIAGRAM
Pattern written in 2017 by Jenn Fox for Mushrump.com. This pattern may not be reproduced or copied without written permission of the author.
